


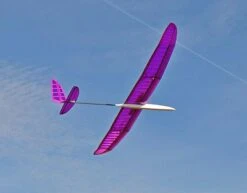


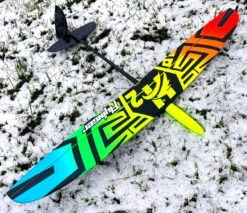
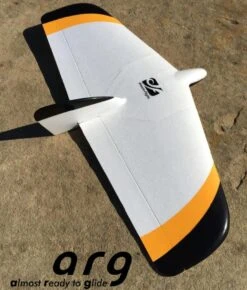
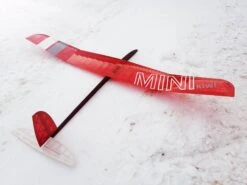
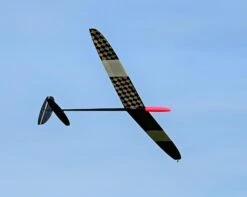
Slite V2 2m
Original price was: £256.28.£99.99Current price is: £99.99.
- Top-Notch Quality
- Unbeatable Quality Guaranteed
- Protecting Your Payment Information
- Product guarantee 100% satisfaction

In 2011 Josef Gergetz of SETA Modelltechnik started to manufacture high quality sailplane kits for the newly emerging 2m build up glider competition class. By the end of 2017 the demand for Slite V2 was so high that Josef Gergetz could no longer keep up with the production. Delivery times were up 9 months and it was decided to switch the production to lasercut technology at a larger manufacturer. It has taken this long to complete this process, but now we are able to quickly supply this model to customers world-wide.
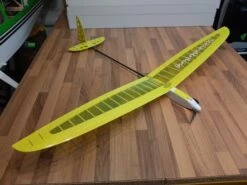
The Slite V2 uses a slightly modified version of the highly regarded AG24 – AG26 airfoil family by Mark Drela. To allow accurate construction of the originally very thin trailing edge the rear of the airfoil was slightly thickened. It gives high lift with comparatively little drag over a wide range of lift coefficients (Cl). Compared to the Pures V2 the Slite V2 has improved L/D, especially at higher speeds.
The wing of the Slite V2 is, like the Pures V2, is built as an open rib construction over very strong wound carbon fiber tube spars. To reduce sagging of the covering film between the ribs two extra sub ribs are used between each full rib. This ensures the wing profile conforms much better to Mark Drela’s original airfoil than other built-up designs.
A balsa jig is supplied to ease positioning of the numerous ribs, ensuring the wing is built in an accurate and speedy manner. The laser cut structure is almost identical to the previous CNC version as there was nearly nothing to improve.
What is new? Besides the new lasercut production, the components are now numbered to ease building. Furthermore, there is an excellent multicolored construction plan and richly illustrated building instructions (in German, but see the English translation here. Please see the Slite V2 and New Slite Available RC Groups threads for more English language build info.
Wing construction
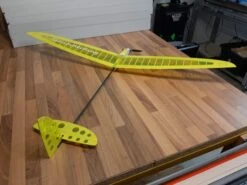
The optimised design uses wound carbon fiber spar tubes, a tapered tail boom and pultruded carbon fibre tubes for the leading edge. The Slite V2 has a three piece wing and is built as an open tubular spar rib construction. The wing joiner is made of 4mm steel wire and is positioned directly in the spar tube. The flat inner wing (with the central airbrake) has an elliptical planform. The elliptical mid panels are joined to the center panel with a dihedral of 8° and are fixed with a specially milled plastic clip to make sure that they don’t slip out during the flight. No need to tape anymore! The lightweight tip panel is joined to the mid panel with a dihedral of 12°.
Fuselage construction
The front of the fuselage is made from balsa with plywood reinforcements and plywood formers. Behind the wing, the wooden fuselage joins the CRP tail boom (wound, tapered carbon fiber spar tube) which is supplied slotted to take the fin. Two holes are already drilled for the horizontal stabilizer pylon and the slots for the bowden tubes are already milled out. The CRP tail boom is manufactured in the same way as the tubular carbon spars of the wings to similarly minimise weight and maximise stiffness. The fuselage is wide enough to fit a single 2600 mAh Li-Ion cell.
Tailplane construction
The Drela HT12 mod profiled tailplane is constructed with balsa ribs, CRP tubular spar and a balsa leading edge.
Electric Modification
The Slite fuselage is very narrow, being only 26 mm wide at the front. Most electric motors will be too large to fit but the Vladimir’s Models Snipe 2e Powertrain could probably be made to work with only minor modifications.
The kit consists of carefully selected and numbered laser cut balsa and plywood parts. All small parts and good quality linkages are included in the kit. RC components, glues and covering material are not included.
| Slite V2 Specifications | ||
|---|---|---|
| Wing span | 2.0 m | 77 in |
| Wing area | 37.0 dm2 | 574 sq in |
| Length | 124 cm | 48.8 in |
| Flying weight from | 440 g | 15.5 oz |
| Wing loading | 11.9 g/dm2 | 3.9 oz/sq ft |
| Aspect ratio | 10.4 | |
| Wing airfoil | AG24 mod / AG26 mod | |
| Dihedral (EDA) | 11.0º | |
| Centre of Gravity | TBA mm from wing leading edge | |
| Controls | Rudder, elevator, spoilers | |
| Slite V2 Typical Weights | ||
|---|---|---|
| Bare structure | 300 g | 10.6 oz |
| Covering | 50 g | 1.8 oz |
| Total structure | 350 g | 12.3 oz |
| Wiring | 6 g | 0.2 oz |
| Receiver | 6 g | 0.2 oz |
| Rudder servo | 9 g | 0.3 oz |
| Elevator servo | 9 g | 0.3 oz |
| Spoiler servo | 5 g | 0.2 oz |
| Battery | 52 g | 1.8 oz |
| Noseweight | 3 g | 0.1 oz |
| Flying weight | 440 g | 15.5 oz |
| Recommended RC | |
|---|---|
| Rudder & elevator servos | Ripmax SD100, Blue Bird BMS-101AMG, Blue Bird BMS-101DMG, Blue Bird BMS-101HV, Blue Bird BMS-A10H, KST X08, Graupner DES 427, ES08 |
| Spoiler servo | Ripmax SD100, Blue Bird BMS-101AMG, Blue Bird BMS-101DMG, Blue Bird BMS-101HV, Blue Bird BMS-A10V, ES08 |
| Receiver | 4 or 5 channel receiver to match your transmitter |
| Battery | HyperLipo 2S 300 mAh, Dream-Flight 300 mAh 4.8V NiMH, HyperFlight 650 mAh 4.8V NiMH, Dream-Flight 700 mAh 4.8V NiMH, 1S 2600 mAh Li-Ion cell. |
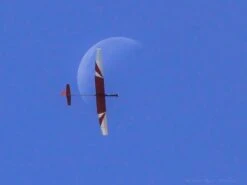
The original V tail version, the current Slite V2 flies even better.
We received this very useful electrification suggestions email from a good customer. See the last (composite) photos above.
At the start of March 2020 I bought a SliteV2 from you and have already sent you a first inspection review. Build is now well on with flying surfaces finished and am working on the fuselage. I did say to you that I intended to electrify the model but only for sport purposes. You may be interested if others enquire in my how to do it notes.
I am surprised how simple it proves to be. Firstly I did not use the two small diameter motors I bought from you as I found a 23mm diameter inrunner lying in a box….no idea what make it is, but it does run nicely on two cells using an Overlander 20A ESC (this latter may be a bit of overkill but better safe than sorry.
Stage1. The nose needs its height and width increasing slightly. For scale my spinner in the photo is 30mm diameter.
First build the fuselage as normal from the boom mount forward to and including the main former (R11)at the leading edge of the wing.
DO NOT glue the fuselage internal ply edge strips (R3,R4)to the fuselage sides forward of this and do not put any vertical strengtheners (R5,R6,R7) in place…
Also omit the servo tray (I was moving mine elsewhere anyway.)
Stage2. Get a supply of finger clamps or clothes pegs ready. Treating one member of R3,R4 at a time you will find there is enough flex in them to be moved slightly vertically while remaining attached at R11. This was a real bit of serendipity. I moved them as far as i needed (see photos) and using PVA clamped and glued them in their new position.
Repeat this for all 4.
Stage 3. DO NOT throw away the matrix balsa sheet (76.02) the fuselage sides came from (you didn’t did you!). Why…… well the curved balsa infills you will need to make up the new fuselage sides on R3 and R4 are already there for you (clever eh…)…… see photo. Cut our and fix these as required.
Stage3. I decided I needed a square section at the nose in the old R9 position to be sanded down later to merge with the spinner.
To this end the thick balsa block holding the unused nose pieces has just enough scrap to include my
initial rectangular blank for my new nose block which will go where R4 was and behind the prop spinner. I will use the actual spinner to mark out a 30mm circle on the front face and sand to that when attached.
Stage4. Other issues. All planking top and bottom from R11 forward will need widening (but you will be well capable of that if you are building this sophisticated, delicate and detailed machine anyway). This also involves widening the removable hatch which I believe will fit quite happily after the above operations. As a side issue I have decided to make my hatch longer anyway to ease access to battery, ESC and servos all in one go. Do not forget to put in place any vertical ply strengtheners from the R5,R6,R7 set but these will all need to be a tad longer….. again the matric sheet of timber will help. The removeable hatch will need its clever vertical rails angle-ing a bit to match the new fuselage side internal width.
The overall result I find very pleasing as the width and height of the nose has not been enlarged to anything that spoils the natural taper of the fuselage from the tail boom forward and the mod uses no more materials than are already in the kit.
Photos will follow of the completed machine….
Best Regards….. Paul S
Be the first to review “Slite V2 2m”
Related products
Electric F5J Gliders
DLG F3K Hand Launch Gliders
F3-RES Thermal Gliders

Electric F5J Gliders
RC Models
F3-RES Thermal Gliders


Electric F5J Gliders

DLG F3K Hand Launch Gliders
Reviews
There are no reviews yet.